
A service request is raised by the client and sent through to your contractor portal. You may also receive an email notification to let you know that a new request requires review or action.
2. Reviewing and accepting the requestThe contractor admin should review the service request in the portal, checking the job details, site information, priority, attendance requirements and any instructions provided by the client.
Within the work order, there is a time tab where you can see all the interactions in regard to the KPIs, such as the response time, the time to attend and the time to fix
Each SLA has a status that shows whether they have been hit or not, with the expected and actual time logs
SLA demo:
How do I request changes to the time to attend SLA:
-
Users can head to the Time tab on the work order and find the time to attend SLA
-
From here, users will see a pencil icon they can select
-
A modal will appear that allows users to select a new date and time and provide a reason for the request
-
Once requested, the relevant users will be notified to review the request
-
Once the request has been reviewed, contractors will be notified whether it has been approved or rejected
How to request a SLA change demo:
Within a work order, there is an assets tab that will show any assets and their details should they have been included on the work order.
Where to find assets demo:
You can add service details to the asset if it is being serviced as part of your visit. You can also link more assets using the blue button, or unlink assets using the unlink icon on the top right of each card.
Depending on the client setup, the contractor admin may need to accept the request before it becomes an active work order. If the request cannot be completed, the admin should follow the agreed process for rejecting or querying the request with the client.
3. Assigning an engineerOnce the request has been accepted, the contractor admin assigns the work to the appropriate engineer. This should be based on the engineer's skillset, availability, location and any client-specific requirements for the job.
Before attendance, make sure any required documentation, such as RAMS, permits or access information, has been reviewed or uploaded where required.
4. Checking in through the admin portalIf required, the contractor admin can check an engineer in through the admin portal. This may be used when the engineer is unable to check in through the app, has connectivity issues on site, or the client process allows admin-assisted check-in.
Admin check-in should only be used where appropriate, and the job record should still reflect the correct attendance time and engineer details.
5. Checking in through the Engineer AppWhen the engineer arrives on site, they should check in using the QR code, taking them to the engineer web based app. The exact steps may vary depending on the client setup, but the process typically includes selecting the work order, confirming attendance, completing any start work checks, and providing location or access validation where required.

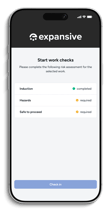
Once check-in is completed, the work order will move into an in-progress state so the client and contractor admin can see that the engineer is on site and work has started.
6. Carrying out the workWhile on site, the engineer carries out the required work in line with the job details and any client instructions. During the visit, the engineer should use the app to add updates, notes, photos, documents, hazard information or follow-on requirements where needed.
Keeping the work order updated throughout the visit helps the contractor admin and client understand what is happening in real time and reduces the need for follow-up queries after the job.
7. Checking out and closing the jobWhen the work has been completed, the engineer should check out through the Engineer App. This usually includes selecting the outcome or resolution, adding completion notes, uploading any required photos or evidence, and confirming that they are leaving site.
Depending on the client setup, the engineer may also need to capture site contact sign-off, complete final checks, provide location confirmation or enter an access code before the job can be closed.
Once checkout is complete, the work order will move into the relevant completed or closed status. The contractor admin should review the job record to make sure all required information has been captured and that the work order is ready for any next steps, such as invoicing, follow-on work or client review.
Adding an external reference on a work order:
-
From the work order screen, select external reference under contractor on the left-hand side
-
Add in the relevant reference
-
Use the search bar to locate the work order the reference refers to
Tip: The exact workflow can vary by client, so always follow the process and required fields shown on the work order. If a check-in, check-out or closure step is missing or unclear, contact your contractor admin or client contact before progressing.
